
I'll show all the prep work I do before I drill holes. RAMjetta has a great video on using a Dremel Workstation that you should follow after you have done all the prep work.
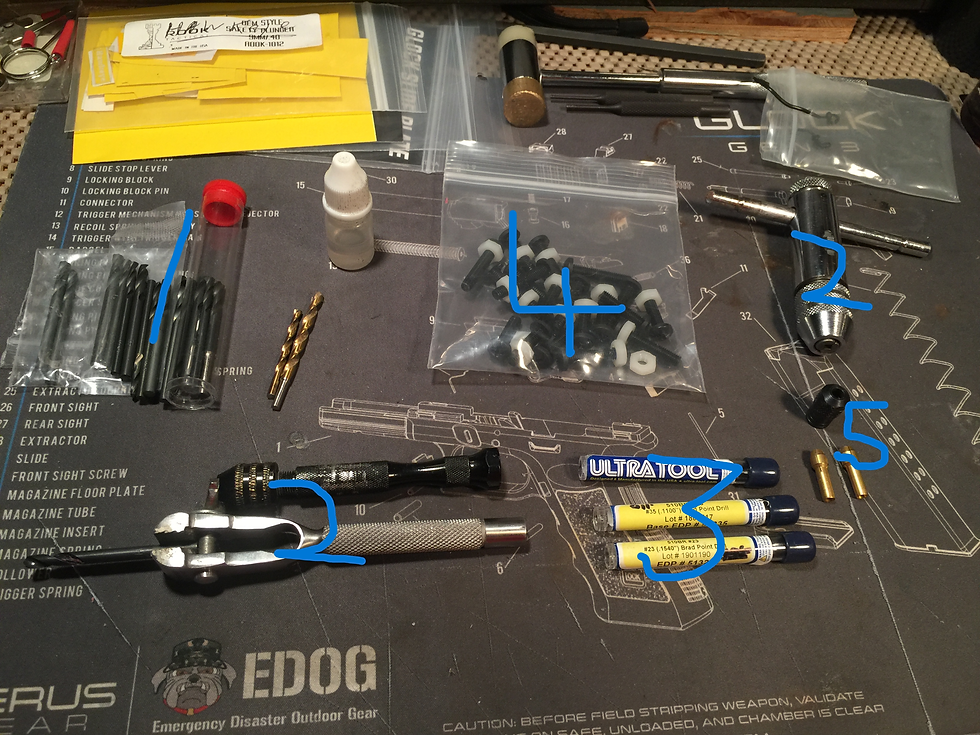
1) I don't know why but I do save all my P-80 drill bits. They are only good for soft wood and plastic,
my guess is they are low carbon high speed bits. next to them are my bits I use BY hand to open up
a drilled hole.
2) Put them in a hand vise (there are all kinds of hand vises and you should have one) You can use a
tap handle but you don't need to use a lot of pressure when using a hand vise, They are for holding
the drill bit level and not for pressure, You should all way I repeat all ways let the drill bit do the
work. That is the only way you have the control of how straight and center your hole is.
3) These are the brad drill bits I use in my Dremel Workstation. They are a few thousands smaller then
3mm and 4mm. More about then later in the post.
4) These are plastic nuts and bolts I have been saving form something I did and saved. (what can I say,
I save just about every nut, bolt, screw, plastic pieces, metal scrap pieces and wood) you never
know when you need to make something. These work great for holding a warped jig in place for
drilling FTQ holes.
5) You really need to use a collet for each bit because they turn true without wobble. A universal
collet will in most cases have a wobble. You can keep moving your bit in a universal collet and get
it to run better, but why just use the collet made to chock up tight on each bit.
You should have some cutting oil. I use just a dab of high speed spindle oil I have left over from working on fishing reels.
Here is what i do with the plastic nuts and bolts. This works great for taking the warp out of a jig.

Here are a close up of the brad bits I use. They are a high speed brad bit made for wood and plastic.
I really don't want to talk about how much I paid for these (way to much) but they have been working out great for me. I have used them on 5 maybe 6 builds now and there is no show of ware.
I use a .110 brad bit for the 3mm and a .154 for the 4mm hole.


these are the tools plus a Dremel Workstation you need now lets talk about the steps.
1) Before you fix the warp in the jig you want to make sure the holes in the jig are to size so, I take a 3mm and 4mm bit in a hand vise to clean up those plastic hole that may have flash in them or just a little off size. The reason I do this is because when I drill I do not want to see any red plastic shavings.
If you see red you have just drilled off center or the jig hole was not to size. This is why you BY hand make sure you have correct size holes. Believe me this will make things a lot easier when you drill the pin holes.
2) I drill some holes for the plastic nuts and bolts for holding the jig tight getting the warp out. This is important because by keeping the jig tight makes sure that the holes drilled will line up for each side of the frame.
3) You really want to use a magnifier to help see if you are having trouble seeing close up like me.
Remember I am using under size brad bits SO you have to center the bits in the hole before you drill.
I use a workstation and do not recommend using a hand drill. To many thing can and will go wrong.
Have I ever use a hand drill? yes and had to fix holes. This was before I found MGB where I learned the right way to go about drilling holes in frames. Just line your bit in the center showing just a little space around the drill bit because it is just under by a few thousands you will not see very much space. When you lift up and down on the workstation there should not be any drag, this is how you know you are centered in the hole. Once your set up center in one down motion drill hole. I set my Dremel around 15-20 rpms.
4) Now that all your holes are drilled its time to get them all sized to the perfect size. Put your 3mm bit into your hand vise to open up the holes to the correct size. There should still be some oil in them from drilling to help with cutting with the 3mm bit in the hand vise and just let the bit do the cutting just hold it level so your hole is at a perfect 90 degree. Run it though a few time cleaning any shavings out each time. Now do the 4mm hole the same way.
5) Now take the frame out of the jig after doing tabs. This is what really makes a clean perfect hole.
I have an old set of pins that I put in a hand drill on low speed with some 500 grit lapping compound. Going in and out for several time will clean and polish the hole. Then I use a new set of pins to make sure that they will fit without having to bet them in and bet them out. You are really looking for what is called a press fit. With just a little pressure you can put pins in and out without having to bet on them. This is what make FTQ pin holes. If it is still hard to push in pins redo the lapping process until you get the press fit.